Packs are used when you have product variants within Shopify. Ex: create a 2 unit pack of the "Car antenna" and link it to the 2 unit variant in Shopify.
Before performing this step, the product or products that we are going to use, must be created in the product section as explained in the article How to register products.
To create packages we are going to enter the Packs section of the left panel.
Within this process, we can find two types of packs:
- Several units of the same product.
- One product with a different one.
How to make a multi-unit pack of a product
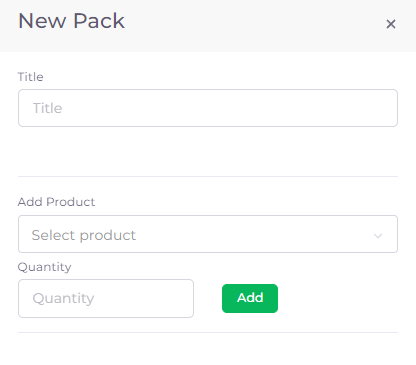
When you click on New pack, a column will pop up on the right to fill in the fields:

- Title: we will indicate the title of the pack.
- Add product: we will select the main product that we are going to sell in packs and that will already be created in our system.
- Quantity: we will indicate the number of units that are sold in a pack.
We click on Add and Save. If the pack consists only of several units of the same product, we would have already finished creating the pack.
How to make a pack with several different products
When you click on New pack, you will see the column on the right mentioned above. The first product will be made as in the previous case:
- Title: we will indicate the title of the pack.
- Add product: we will select the main product that we are going to sell in the pack and that will already be created in our system.
- Quantity: we will indicate the number of units that are sold in a pack.

Once we have added it, without closing, we add the second product that is part of the pack.
- Add product: we will select the other product that we want and that will already be created in our system.
- Quantity: we will indicate the number of units that are sold in a pack.
Click on Add and Update.
How to link the packs to our store
As with the products, the packs have to be synchronized with the store so that the orders come in and your stock is updated. Read this article if you have created a pack to see how to link it to your store: How to link product packs.
How to edit or delete packs
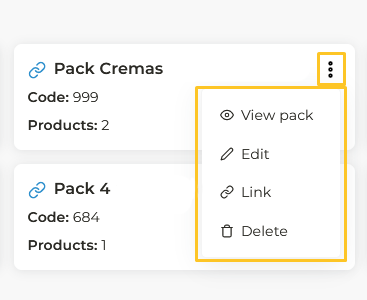
Once we have created the packs, we can perform different actions on it. We can link, as mentioned above, but we can also do other actions:

- View pack: when you click on this button, it will show you the packs created for that product.
- Edit: the packs configuration column will open again, where you can edit, delete and add new packs.
- Delete: to delete all the packs of a product. Be careful, if you want to delete only one of the packs, for example, delete the pack of 2 units of a T-shirt, but leave the pack of 3 and 4 units, you must do it from the edit button, since this deletes all of them.